Delta Two-Handle Bathroom Faucet Repair Kit Overview
Yo, ever had a leaky faucet that’s driving you crazy? Or maybe your bathroom faucet is just plain old and needs a makeover? Well, the Delta Two-Handle Bathroom Faucet Repair Kit is here to save the day. It’s basically a lifesaver for those annoying bathroom faucet issues.
This repair kit is designed to fix those common faucet problems that make you wanna pull your hair out. Think leaky faucets, worn-out cartridges, and even broken handles. You know, all those things that make your bathroom feel like a total mess.
Benefits of Using the Delta Two-Handle Bathroom Faucet Repair Kit
The Delta Two-Handle Bathroom Faucet Repair Kit is the real deal when it comes to fixing your bathroom faucet. It’s way better than trying to find individual parts or calling a plumber. Here’s why:
- Convenience: This kit has all the parts you need to fix your faucet, so you don’t have to run around town trying to find everything. It’s like having a toolbox specifically for your bathroom faucet.
- Cost-Effective: This kit is way cheaper than calling a plumber, especially if you’re handy with tools. You’ll save some serious cash by fixing it yourself.
- Easy to Use: Most Delta Two-Handle Bathroom Faucet Repair Kits come with instructions, so even if you’re not a DIY pro, you can still fix your faucet without any major drama.
Identifying Compatible Delta Faucets
This repair kit is designed for a specific range of Delta two-handle bathroom faucets. It’s crucial to make sure your faucet is compatible with the repair kit before you start any repairs. Using the wrong repair kit can lead to further damage or even make the problem worse.
Identifying the Model Number
To determine if your faucet is compatible, you’ll need to find its model number. Delta faucets typically have the model number printed on a sticker located on the underside of the faucet handle or spout. You can also check the Delta website or contact their customer support for assistance.
Importance of Choosing the Right Repair Kit
Using the correct repair kit is vital for a successful repair. Each Delta faucet model is designed with specific parts and dimensions. Using a repair kit designed for a different model could lead to compatibility issues, resulting in a failed repair or even further damage to your faucet. It’s always best to use a repair kit that is specifically designed for your Delta two-handle bathroom faucet model.
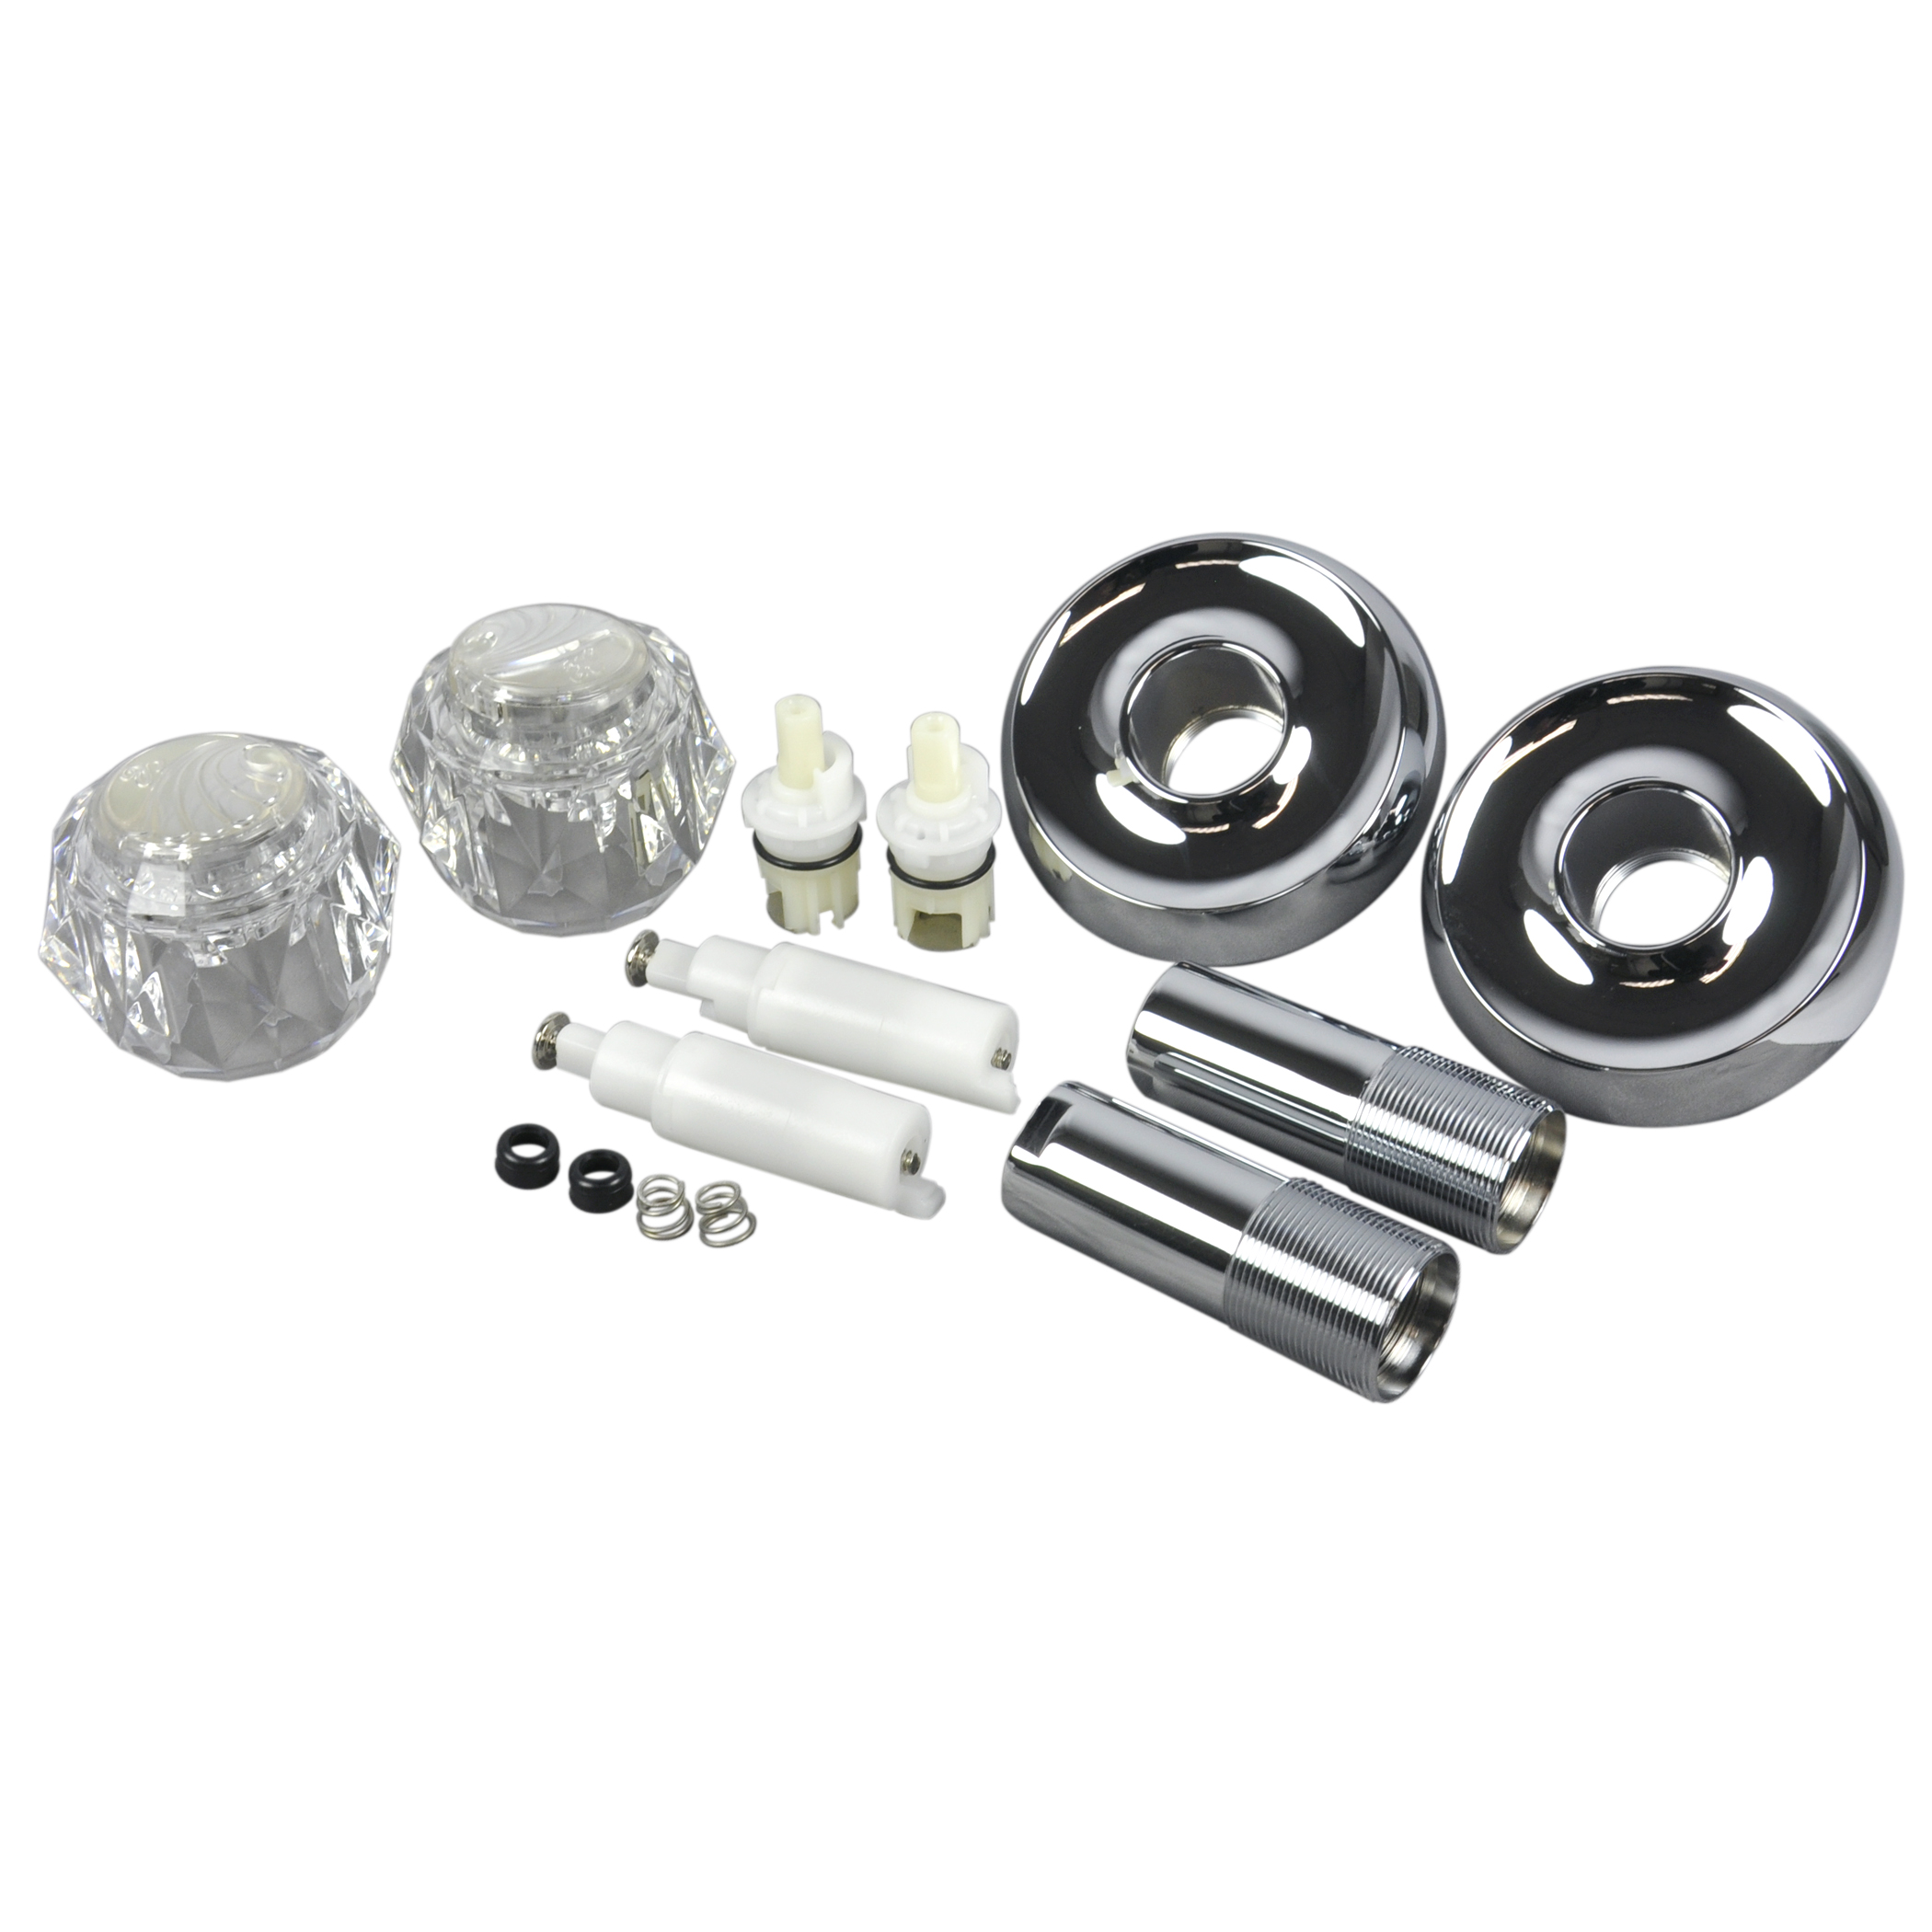
Repair Kit Components
:max_bytes(150000):strip_icc()/repair-a-two-handle-cartridge-faucet-1824887-04-9236640018c941eb970815539aa094e2.jpg)
The Delta Two-Handle Bathroom Faucet Repair Kit typically includes a variety of components designed to address common wear and tear issues in your bathroom faucet. These components work together to restore the proper function of your faucet and ensure a smooth and leak-free operation.
Components Included in the Repair Kit
The specific components included in the Delta Two-Handle Bathroom Faucet Repair Kit may vary depending on the model of the faucet and the manufacturer. However, a typical kit will include the following:
| Name | Description | Function |
|---|---|---|
| Cartridges | The cartridges are the heart of the faucet, controlling the flow of water. They are typically made of ceramic or metal and contain a series of internal parts that regulate the water flow and temperature. | The cartridges are responsible for regulating the water flow and temperature of the faucet. They control the opening and closing of the water valves and allow you to adjust the water flow and temperature to your desired settings. |
| O-Rings | O-rings are small, circular seals made of rubber or other materials. They are used to create a tight seal between different parts of the faucet, preventing leaks and ensuring a smooth operation. | O-rings are used to create a tight seal between different parts of the faucet, such as the cartridge and the faucet body. This prevents water from leaking and ensures a smooth and leak-free operation. |
| Washers | Washers are flat, circular pieces of material that are used to create a seal between moving parts in the faucet. They help to prevent leaks and reduce friction between the parts. | Washers are used to create a seal between the moving parts of the faucet, such as the faucet stem and the cartridge. This helps to prevent leaks and reduce friction between the parts. |
| Springs | Springs are used to provide tension and return the faucet handle to its original position after it is turned. They are typically made of metal and are designed to withstand repeated use. | Springs are used to provide tension and return the faucet handle to its original position after it is turned. This ensures that the faucet is properly closed and prevents leaks. |
| Screws | Screws are used to secure the various components of the faucet together. They are typically made of metal and are designed to be durable and resistant to corrosion. | Screws are used to secure the various components of the faucet together, ensuring that all the parts are properly assembled and secured. |
Installation Process
:max_bytes(150000):strip_icc()/repair-a-two-handle-cartridge-faucet-1824887-02-e108124bf17d4cb8977a861fb19b490e.jpg)
Installing a Delta Two-Handle Bathroom Faucet Repair Kit is a relatively straightforward process that can be completed with basic tools and a little patience. This section will guide you through the steps, providing you with the knowledge and confidence to tackle this repair.
Steps for Installing a Delta Two-Handle Bathroom Faucet Repair Kit
Here’s a step-by-step guide to help you install your Delta Two-Handle Bathroom Faucet Repair Kit.
- Gather Your Supplies: Before you begin, ensure you have all the necessary tools and materials. You’ll need a Phillips head screwdriver, a wrench, a pair of pliers, and the Delta Two-Handle Bathroom Faucet Repair Kit.
- Turn Off the Water Supply: Locate the shut-off valves for your bathroom sink’s water supply. These valves are usually found under the sink or behind the wall. Turn the valves clockwise to shut off the water flow to the sink.
- Remove the Old Cartridge: Use a wrench to loosen and remove the old cartridge from the faucet. The cartridge is the component that controls the flow of water.
- Clean the Faucet Body: Use a cloth or sponge to wipe away any debris or buildup inside the faucet body. This will ensure a clean and smooth installation of the new cartridge.
- Install the New Cartridge: Carefully insert the new cartridge into the faucet body. Make sure the cartridge is properly seated and aligned.
- Tighten the Cartridge: Use a wrench to tighten the cartridge securely. Don’t overtighten, as this could damage the cartridge or faucet body.
- Reconnect the Water Supply: Turn the water supply valves counterclockwise to restore the water flow to the sink.
- Test for Leaks: Run the water for a few minutes to check for any leaks. If you notice any leaks, tighten the cartridge or check the connections for any loose fittings.
- Reassemble the Faucet: If you have removed any other components during the repair, reassemble the faucet according to the manufacturer’s instructions.
Troubleshooting Common Installation Challenges
Sometimes, even with the best intentions, you might encounter a few bumps in the road. Here are some common installation challenges and how to address them:
- Leaking Faucet: If the faucet is leaking after installation, check the cartridge to ensure it is properly seated and tightened. Also, inspect the O-rings and washers for damage or wear.
- Loose Cartridge: If the cartridge feels loose, try tightening it further. However, be careful not to overtighten. If the cartridge is still loose, you may need to replace the cartridge with a new one.
- Difficulty Turning Handles: If the handles are difficult to turn, check for debris or buildup in the faucet body or the handles themselves. Clean any debris or buildup and try turning the handles again.
Maintenance and Care: Delta Two Handle Bathroom Faucet Repair Kit
:max_bytes(150000):strip_icc()/repair-a-two-handle-cartridge-faucet-1824887-hero-46a7f7b8303a40e88a3efea73c3381d3.jpg)
Keeping your repaired Delta two-handle bathroom faucet in tip-top shape is a breeze, and it’ll pay off in the long run. A little TLC now can prevent major problems down the road. Here’s the lowdown on how to keep your faucet flowing smoothly.
Cleaning and Lubrication, Delta two handle bathroom faucet repair kit
Regular cleaning and lubrication are essential for a long-lasting faucet. You’ll want to clean your faucet regularly to prevent mineral buildup and keep it looking fresh.
- Wipe down the faucet with a damp cloth and mild soap to remove dirt and grime.
- Use a soft-bristled brush to clean the aerator, which is the small screen at the end of the spout. This will help to remove any mineral deposits that can clog the aerator.
- Apply a small amount of silicone-based lubricant to the faucet’s moving parts, such as the handle stems and the cartridge. This will help to keep the faucet moving smoothly and prevent corrosion.
Preventing Future Problems
Taking good care of your faucet can prevent future problems. Here’s how:
- Avoid using harsh chemicals or abrasive cleaners on the faucet, as these can damage the finish.
- Don’t overtighten the faucet handles, as this can damage the internal components.
- Be careful not to drop anything heavy on the faucet, as this can cause damage.
- If you notice any leaks or drips, address them promptly. Small leaks can quickly turn into bigger problems if they’re not fixed right away.
Extending the Lifespan
By following these tips, you can extend the lifespan of your repaired Delta two-handle bathroom faucet:
- Use a water filter to reduce the amount of minerals in your water, which can cause mineral buildup and corrosion.
- Avoid using the faucet for extended periods of time with the hot water turned on full blast. This can cause the faucet to overheat and damage the internal components.
- Turn off the water supply to the faucet when you’re not using it. This will help to prevent leaks and reduce water waste.
Alternatives and Considerations
Sometimes, fixing a leaky faucet with a repair kit isn’t enough, and you might need to consider other options. Replacing the entire faucet or seeking professional help are two common alternatives.
Let’s explore the cost-effectiveness of different repair options and when you should call a plumber.
Cost-Effectiveness of Repair Options
The cost-effectiveness of different repair options depends on several factors, including the age of the faucet, the severity of the problem, and your DIY skills.
- Repair Kit: Repair kits are usually the most cost-effective option, especially for minor issues like worn-out O-rings or washers. They’re relatively inexpensive and easy to install, making them a great choice for DIY enthusiasts.
- Replacing the Entire Faucet: Replacing the entire faucet can be more expensive than using a repair kit, but it’s a good option if the faucet is old, damaged beyond repair, or simply outdated. Newer faucets often come with advanced features and improved water efficiency, making the investment worthwhile in the long run.
- Professional Plumbing Assistance: Calling a plumber can be the most expensive option, but it’s often the best choice for complex repairs or if you’re not comfortable working with plumbing. Plumbers have the expertise and tools to diagnose and fix even the most challenging faucet problems.
Situations Where Professional Plumbing Assistance is Recommended
While you can tackle many faucet repairs yourself, some situations require professional expertise. Here are a few examples:
- Leaking Pipes: If the leak is coming from the pipes leading to the faucet, it’s a sign of a bigger problem that requires professional attention.
- Corrosion or Damage: If the faucet is severely corroded or damaged, attempting to repair it yourself could make the problem worse.
- Complex Repairs: If the faucet has a complex design or requires specialized tools, it’s best to leave it to a professional.
- Safety Concerns: If you’re not comfortable working with plumbing or if there are safety concerns, don’t hesitate to call a plumber.

